I received The Yummy blog Award from the elegant and talented Jennifer at Vegeyum a few days ago. So I thought I would bake Jennifer a cake, a typical South African way of showing appreciation. I grew up with my mother constantly baking a cake of some kind for a someone of some kind to say a thank you of some kind. It made everybody happy. My mother was happy, because she loved doing it, the receiver was happy of course and the people in close vicinity were happy, since everybody got to share in the gift.
So I baked her a cake, a strawberry tart.

I like simple. And that goes for desserts too. Well, actually, according to various opinions, I can rather complicate life, but let’s say then I try to keep it simple. I tried to make a simple strawberry tartlet, with just a tiny twist… The first attempt was a failure in terms of presentation, but it tasted not too bad. Or so my audience said..
Cookie crumb base: Mix about 12 speculoos, crumbled, with 40 g of melted butter. With the aide of cooking rings, shape into round bases and set aside in the fridge.
Lime cream:
- 250ml milk
- zest of one lime
- 3 large egg yolks
- 60 g sugar
- juice of half a lime
- 35 g Maizena
- 25 g butter
- Heat the milk and lime zest and leave aside to infuse.
- Whisk the egg yolks with the sugar until light and creamy
- Stir the maizena into the lime juice and add to the egg yolks.
- Slowly add the warm milk through a sieve, while whisking. Return to the heat and cook over low heat until thick, while constantly stirring.
- Remove from the heat, add the butter, cover with cling film and leave aside to cool down and store in the refrigerator until needed.
Serving suggestion:
Remove the cookie crumb bases from the fridge. Fill up with the cold lime cream and top with strawberries, finely sliced. Remove the rings carefully. Finish off with a sprinkling of toasted pine nuts. Serve with a red berry coulis. (optional) And now this is where I failed. My lime cream was too runny and I couldn’t use the rings, so I escaped out of my predicament with the help of some tartlet pans…
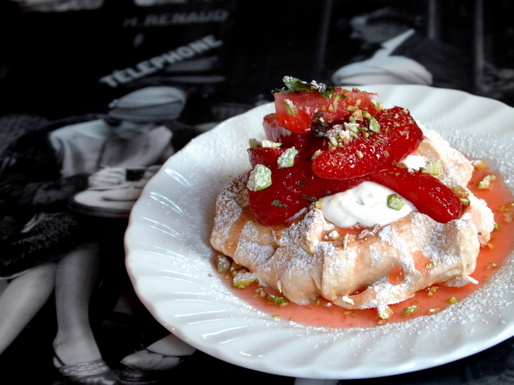
The second attempt was made with meringue, which is quick and simple, but it wasn’t what I was looking for either. I’m not too crazy about meringues. The audience was happy again though…
Meringue:
- 2 egg whites at room temperature
- 1 ml salt
- 125 ml castor sugar
- pinch of cream of tartar
- Heat the oven to 120 degr. C. Line a baking sheet with Bakewell paper.
- Place the egg whites, salt and cream of tartar in a clean, dry glass bowl or better yet, copper bowl,
- Beat on high speed until firm.
- Add 2 high spoon fulls of sugar to the mixture and beat again until stiff and glossy.
- Fold in the rest of the sugar.
- Shape big spoon fulls of meringue onte the baking sheet, depending on how big you want your little tartlets, shaping a hole in the centre.
- Sprinkle some sugar over the top, allow to stand for about 3 minutes to give the sugar chance to melt(adds a crystallized appearance to the meringues)
- Bake for about 20 minute, cover with a sheet of peper and bake another 40 minute. Switch off the oven and leave the meringues in the oven, to dry out completely.
Strawberries: Wash and cut a handful of strawberries into quarters. Sprinkle with a tablespoon of sugar, a drizzle of white balsamic vinegar, some grated lemon zest.
Fresh whipped cream with a packet of stabilizer added to keep the cream firm. Joghurt can be added to make lighter.
Serving suggestion: Place a meringue on each individual plate. Fill with a scoop of whipped creme, arrange some strawberries on top and drizzle some of the juice of the strawberries over the top. Finish off with a sprinkling of chopped pistachio nuts and mint and a drizzle of thick balsamic syrup(optional).
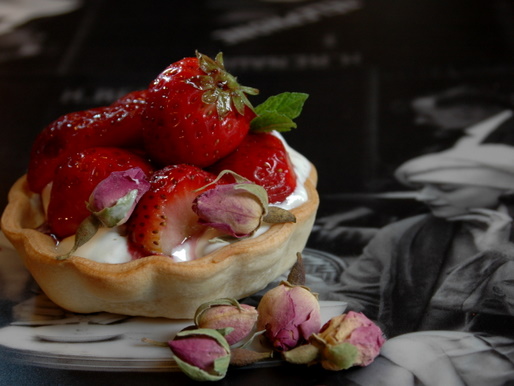
The third attempt was probably more what I was looking for and it actually delighted my taste buds, like all strawberry tartlets do! Voila!! My most favourite dessert…for now.
Pate sablée:
- 125 g castor sugar
- 1 vanilla pod
- 250 g flour
- 125 g butter at room temperature
- 1 egg
- Scrape the seeds from the vanilla pod and mix with the sugar.
- Sift the flour onto the work surface and work the butter through with your fingertips until the mixture resembles breadcrumbs.
- Make a hole in the centre of the flour mixture and break the egg open into the centre. Add the sugar.
- Mix the ingredients lightly together with the fingertips, until a dough forms. Knead lightly with the palm of the hand to shape into a ball. cover with clingfilm and leave to rest for an hour in the fridge.
Cream filling: Mix together 200 g of mascarpone cheese and 2 tablespoons of Bulgarian joghurt. Add some lemon mint chiffonade. Leave to infuse.
Strawberries: Wash, cut and sprinkle lightly with rose water.
Serving suggestion:
- Roll out the dough and cut into desired shapes for your tartlet pans. Cover the bases with bakewell paper and add beans(blind baking), leave in the fridge for a few minutes.
- Prick lightly with fork and bake blind at 200 degr. C for about 12 minutes. Remove the paper and beans and bake for another 3 minutes until golden.
- Remove from the oven and let cool. Once cooled, remove the shells from the tartlet pans.
- Fill with prepared cream, add washed and cut strawberries.
- Warm some jam of your choice, add a few drops of rose water and glaze the tartlets.
- Decorate with fresh or crystallized untreated rose petals.
While making this strawberry tart, it so happened that I stayed very true to my original statement of Myfrenchkitchen, which says something like this: “Life in a kitchen is an everyday audition and here I telltale of my surrender to the failures, the successes, the hitches and pleasures……that life in a kitchen forks out.”
Thank you for honouring me with this award Jennifer.

The Yummy Blog award was first conceptualized by Roopa of Kitchen Treats. Hi dear readers/fellow bloggers, I am starting an award category called “Yummy Blog ! ” where the blog with most yummy recipes/photos will get the award. The person who receives the award should display the “Yummy Blog !” logo on their blog and also the meaning of the award which is “Yummy blog award is the award given to the blog with most yummy recipes/photos” The receiver should also quote their favorite yummy-licious 🙂 dessert(s) that they have ever prepared/eaten. Dont restrict yourself to any dessert, chocolate bars also welcome:). Also the receiver should pass on the award to four other bloggers who’s blog they find “yummy” and let them know about the rules:)
I am now passing this on to:
- Jeanne at Cooksister, who always has me pinned to her writing and images and recipes and bucketsful of zest for life!
- Lucy at Kitchen notebook, whose stories and food experiences are so vividly shared with us, it is a magical carpet ride every time I visit there!
- Ann and Jack at Redacted recipes, who can make a kitchen spin with action between the two of them, always fun, always exciting!
- Hilda at Dhanggitskitchen, who has me running to my camera, completely fired up with inspiration, every time I leave there…she has some photography secret I would love to discover!
- See also my link list for more inspirational work.
And lastly, if you have the time, please see my friend’s daugther Claire’s thesis project on designing a cooking station. This is her final year in design and she would like some public input before her final presentation, so feel free to comment.