Fig and goat’s cheese tartlets

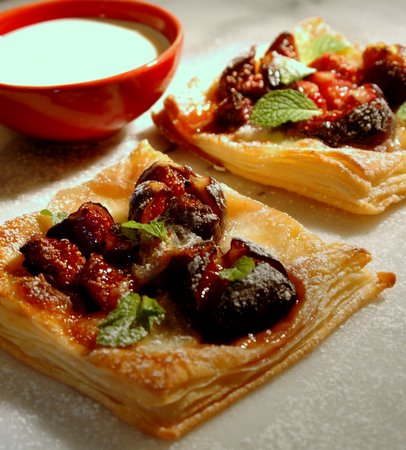
I have made these tartlets so many times before, using all different kinds of ingredients and they are a winner every time, enjoyed by young and old. They are rustic and full of heart, quick and easy to make. My kind of thing. Given of course, that you use ready made puff pastry. In summer,  it is great with cherry tomatoes and of course all the wonderful seasonal fruits availalble. In winter, red caramelized onions, or cubed sweet potatoes. I tried this time to use mozzarella with the figs in place of the goat’s cheese that I always use. It didn’t turn out too bad, but I have to admit, I prefer the goat’s cheese. It is up to you to try both and choose what you prefer, or even leave out the cheese. Don’t forget the mint leaves though, they add to the harmony of the whole ensemble. I don’t give exact quantities, it is up to your taste.

Fig and goat’s cheese tartlets

dsc_0004.JPG

  • puff pastry
  • melted butter
  • 12 small figs
  • goat’s cheese/buffalo mozzarella cheese
  • brown sugar
  • fig balsamic vinegar/port
  • icing sugar
  • small mint leaves
  • cream/crème fraîche/natural joghurt/ice cream
  • honey(optional)
  1. Heat the oven to 200 degrees C.
  2. Unroll the puff pastry and cut 4 squares of about 10 x 10 cm. Place the squares on a baking sheet, lined with baking paper.
  3. Prick the inside of each pastry square with a fork and brush with the melted butter.
  4. Tear the goat’s cheese/mozzarella cheese into pieces and place in the middle of each square.
  5. Clean the figs with a towel and cut a cross on the top. Push to open up like a flower and place three opened up figs on top of the cheese. 
  6. Place a drop of fig balsamic vinegar/or port onto each fig. Be careful not to drop too much for it will make the tartlets soggy.
  7. Sprinkle with brown sugar.
  8. Bake in the oven for about 10 to 12  minutes until the pastry is puffed up and golden brown.
  9. Remove and cool.
  10. Drizzle with some honey, sprinkle with sifted icing sugar  and decorate with small mint leaves.
  11. Serve with crème fraîche/joghurt/ice cream on the side  

                                        fietse.JPG


Decadent chocolate cake

Baked for a friend’s brithday. He adores rich, heavy chocolate cakes. So I baked him one. The one day it was still under the cloche on the dresser, the next morning it was gone. We had eaten the birthday cake at midnight. So I had to bake another one.

Decadent chocolate cake

dsc_0016-3.jpg

  • 250 ml ( 1 cup)plain flour
  • 125 ml (1/2 cup) cacao powder
  • 62,5 ml (1/4 cup) jam of your choice ( I prefer apricot)
  • 250 ml (1 cup) castor sugar
  • 125 g (about 4 1/2oz ) butter
  • 4 large eggs, seperated
  • extra jam of your choice, heated for easier brushing
  • 125 g ( about 4 1/2 oz) dark chocolate
  • 125 ml (1/2 cup) thick cream
  • a knob of butter
  1. Preheat the oven to 180 degrees C.
  2. Line and a 20 cm round cake tin with baking powder and butter.
  3. Sift the cacao and flour together in a mixing bowl.
  4. Combine the sugar, jam and butter and melt over low heat(on the stove or in the microwave), stirring frequently, until the sugar has dissolved and the mixture is smooth.
  5. Add the melted sugar mixture into the flour, add the eggs yolks and mix well.
  6. Beat the egg whites in a bowl until soft peaks form. Fold into the cake mixture.
  7. Pour into the prepared cake tin. Bake for 40 minutes or until a testing skewer pulls out clean when inserted into the centre of the cake. Leave to cool and turn out onto a wire rack.
  8. Ganache topping: Combine the chocolate and cream and heat over low heat (on tove or in the microwave, stirring often) until melted. Take off the heat and whisk in the knob of butter until the mixture is smooth and glossy.
  9. To assemble: Cut the cake horizontally into two or three layers using a long serrated knife, depending on your desire. Brush each layer with some heated jam of your choice, assemble and brush the top and sides with jam as well. While still on a wire rack, pour the ganache topping over the cake and smooth the top and sides with a spatula. Allow to set before decorating and transferring to a plate.
  10. Chocolate shavings: melt dark chocolate over low heat and pour onto a cool, flat surface. Place into the refigerator to become hard. Using a sharp knife scrape at an angle of about 45 degrees over the chocolate spread away from you. You can use an ice cream scoop for thicker and biffer curls. Refrigerate the shavings between baking paper until needed.
  11. Use for decoration on your chocolate cake and finish off with a touch of silver leaf or gold leaf.

a medium cake

dsc_0014-1.jpg

Commentaires

Yummy…

That cake looks so good right now… and I love the picture. It looks like those two angels are about to dive in and take a nice big bite!!!!

Posté par Marinell, 23-07-2007 à 15:14

–>Oh Ronell, what a heavenly picture of a chocolate cake that is! I am going to have to try that sometime. Btw, I have tagged you for a meme – details on my blog today. Pls don’t feel obliged though 🙂

Posté par Jeanne, 23-07-2007 à 19:25

–>Thanks MArinell..yip, I never saw that and you’re right, they look like they’re just making up their mind!
Thanks Jeanne…also for the tag. Why not!? will have a look at your blog, thanks.
Ronell